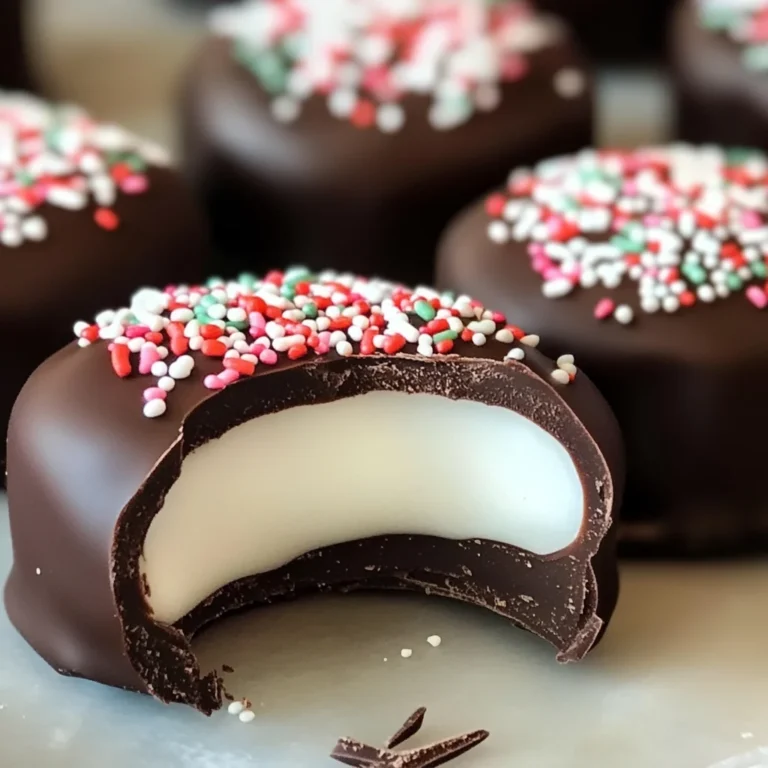
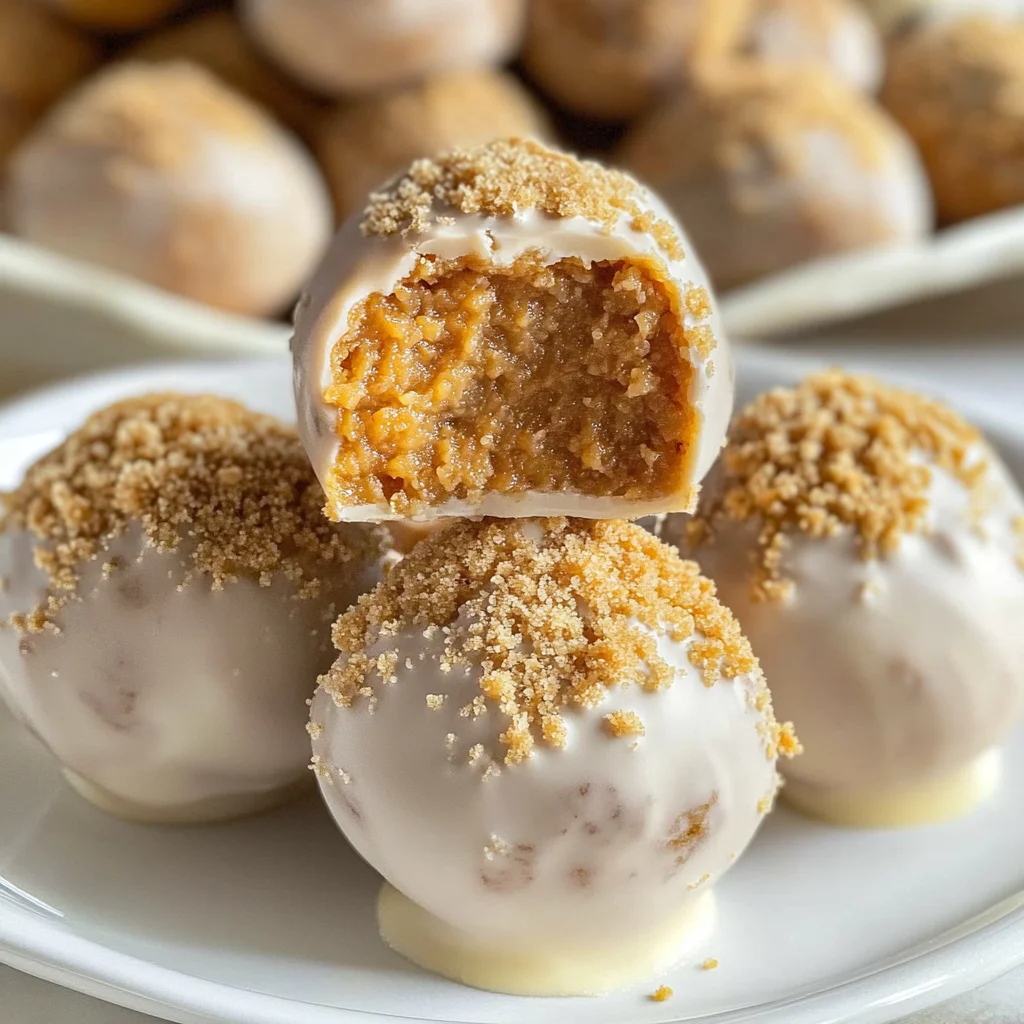
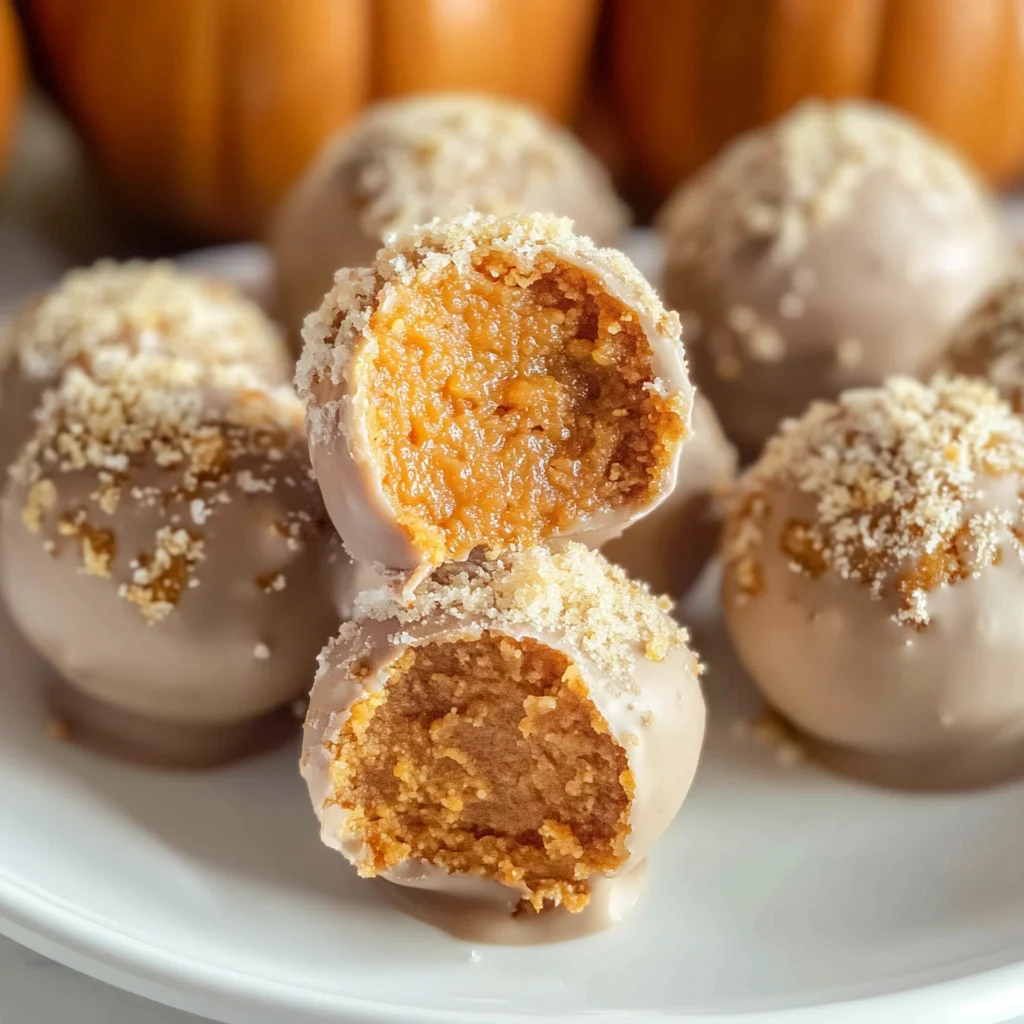
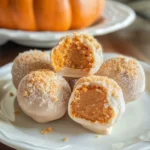
No-Bake Pumpkin Pie Balls
Turn leftover Thanksgiving pie into bite-sized heaven with these No-Bake Pumpkin Pie Balls. A whole new way to enjoy pumpkin pie! These delightful treats are perfect for parties, gatherings, or just a cozy night in. With their creamy filling and sweet candy coating, they are sure to be a hit during the fall season.
Why You’ll Love This Recipe
- Quick and Easy: This recipe requires no baking, making it a hassle-free treat to whip up.
- Delicious Flavor: Enjoy the classic taste of pumpkin pie in a fun, bite-sized form.
- Perfect for Any Occasion: Great for Thanksgiving, holiday parties, or as an everyday snack.
- Versatile Treat: Use different toppings or coatings to customize your No-Bake Pumpkin Pie Balls.
- Kid-Friendly: Kids will love helping with the rolling and coating process!
Tools and Preparation
To make No-Bake Pumpkin Pie Balls, gather your tools and prepare your workspace. Having everything ready will streamline the process.
Essential Tools and Equipment
- Electric mixer
- Parchment paper
- Baking sheet
- Shallow bowl
- Fork
Importance of Each Tool
- Electric mixer: Helps to easily combine the pie filling and crust into a smooth mixture.
- Parchment paper: Prevents sticking, ensuring easy removal of pie balls after chilling.
- Baking sheet: Provides a stable surface for chilling the pie balls before coating.
Ingredients
For the Pie Balls
- 1 (9-inch) baked and chilled pumpkin pie, store-bought is great!
- 1 (16 ounce) package vanilla candy coating or almond bark
How to Make No-Bake Pumpkin Pie Balls
Step 1: Prepare the Pie Mixture
- Reserve some of the pie crust to crumble on the balls after you coat them in the candy coating.
- Break up chilled pie (filling and crust) into the bowl of an electric mixer.
- Beat on low speed until it all comes together in a moist ball. You can also do this step with your hands in a large bowl.
Step 2: Shape the Pie Balls
- Roll the pie mixture into 2-tablespoon sized balls.
- Place them on a parchment-lined baking sheet.
Step 3: Chill Before Coating
- Place pie balls in the freezer for 30 minutes or in the refrigerator for 2 hours.
Step 4: Coat with Candy Coating
- Melt candy coating according to package directions in a shallow bowl.
- Dip one pie ball at a time into the melted candy coating.
- Use a fork to turn it around until completely coated.
- Gently lift the coated pie ball from the candy coating with the fork, letting excess drip back into the bowl.
- Transfer back to the parchment-lined baking sheet and immediately sprinkle with some of the reserved pie crust crumbles.
- Repeat with remaining pie balls.
Step 5: Set and Serve
Let pie balls rest until candy coating is completely set before serving. Enjoy these delightful bites!
How to Serve No-Bake Pumpkin Pie Balls
No-Bake Pumpkin Pie Balls are a delightful treat perfect for any occasion. Whether you’re hosting a holiday party or enjoying a cozy night in, these bite-sized delights can be served in various ways to enhance their appeal.
Creative Serving Suggestions
- On a Dessert Platter: Arrange the pie balls on a festive platter with seasonal decorations like autumn leaves or mini pumpkins for a charming presentation.
- With Whipped Cream: Serve alongside a dollop of whipped cream for an extra creamy texture that complements the pumpkin flavor.
- As Party Favors: Package individual pie balls in clear bags tied with ribbons for guests to take home as a sweet reminder of your gathering.
- With Hot Drinks: Pair them with warm beverages like spiced cider or hot chocolate, making them perfect for chilly fall evenings.
How to Perfect No-Bake Pumpkin Pie Balls
Perfecting your No-Bake Pumpkin Pie Balls is easy with a few simple tips. Follow these suggestions for delicious results.
- Chill the Mixture: Ensure the pie mixture is well-chilled before rolling into balls; this helps them hold their shape better.
- Use Quality Coating: Choose high-quality candy coating or almond bark for a smooth and rich finish that enhances flavor.
- Experiment with Toppings: Try adding crushed nuts, sprinkles, or even a drizzle of chocolate on top for added texture and taste.
- Store Properly: Keep the pie balls in an airtight container in the refrigerator to maintain freshness and prevent sticking.
Best Side Dishes for No-Bake Pumpkin Pie Balls
While No-Bake Pumpkin Pie Balls shine on their own, pairing them with complementary side dishes can elevate your dessert experience. Here are some tasty options.
- Spiced Apple Cider: A warm, aromatic drink that complements the flavors of pumpkin beautifully.
- Maple Pecan Tart: This nutty dessert pairs well with the creamy pumpkin filling and adds an elegant touch to your spread.
- Cinnamon Sugar Pretzels: These crunchy snacks provide a fun contrast to the soft texture of the pie balls.
- Cheese Board: A selection of sharp cheeses balances out the sweetness of the pie balls, creating a delightful savory-sweet combination.
- Roasted Sweet Potatoes: Their natural sweetness enhances the pumpkin flavor while adding some heartiness to your meal.
- Fall Salad: A fresh salad with seasonal ingredients like cranberries and feta adds brightness and balance to your dessert table.
Common Mistakes to Avoid
Making No-Bake Pumpkin Pie Balls can be simple, but there are a few common pitfalls that you should watch out for.
- Using warm pie: Ensure your pumpkin pie is completely chilled before mixing. Warm pie will make the mixture too soft and difficult to shape.
- Not measuring ingredients: Be precise with your measurements, especially the candy coating. Too much or too little can affect the texture and coating.
- Overmixing the filling: Mix just until combined. Overmixing can lead to a gummy texture instead of a smooth consistency.
- Skipping the chill time: Don’t skip freezing or refrigerating the balls before coating. This step helps them hold their shape during dipping.
- Neglecting toppings: Remember to sprinkle reserved pie crust crumbs on top right after coating. It adds flavor and makes your treats visually appealing.
Storage & Reheating Instructions
Refrigerator Storage
- Store in an airtight container for up to 5 days.
- Keep layers separated with parchment paper to avoid sticking.
Freezing No-Bake Pumpkin Pie Balls
- Freeze in a single layer on a baking sheet before transferring them to a freezer-safe container.
- They can last up to 3 months in the freezer.
Reheating No-Bake Pumpkin Pie Balls
- Oven: Preheat to 350°F (175°C). Reheat on a baking sheet for about 10 minutes.
- Microwave: Use low heat for 15-20 seconds. Check frequently to avoid melting.
- Stovetop: Warm gently in a pan over low heat, turning occasionally until warmed through.
Frequently Asked Questions
Here are some common questions about making No-Bake Pumpkin Pie Balls.
Can I use homemade pumpkin pie?
Yes, homemade pumpkin pie works great. Just ensure it’s fully chilled before using it in the recipe.
How do I customize my No-Bake Pumpkin Pie Balls?
Feel free to add spices like cinnamon or nutmeg into the filling for extra flavor. You can also experiment with different toppings!
Can I use white chocolate instead of candy coating?
Absolutely! Melted white chocolate can create a deliciously sweet coating for your No-Bake Pumpkin Pie Balls.
How long does it take for the candy coating to set?
The candy coating typically sets within 30 minutes at room temperature. For quicker results, place them in the fridge for about 15 minutes.
Final Thoughts
No-Bake Pumpkin Pie Balls are a delightful way to enjoy leftover pumpkin pie in bite-sized form. They’re easy to make and perfect for any occasion, from holiday parties to cozy gatherings. Feel free to get creative with flavors and toppings, making each batch uniquely yours!
No-Bake Pumpkin Pie Balls
Transform your leftover Thanksgiving pie into an irresistible treat with No-Bake Pumpkin Pie Balls! These bite-sized delights are a fun twist on traditional pumpkin pie, featuring a creamy filling encased in a sweet candy coating. Perfect for parties, cozy nights in, or as a festive snack, these treats will please both kids and adults alike. With minimal effort and no baking required, you can whip up these delicious pumpkin dessert bites that capture the essence of fall. Enjoy them as is or customize with your favorite toppings for a personal touch!
- Prep Time: 20 minutes
- Cook Time: 0 minutes
- Total Time: 20 minutes
- Yield: Approximately 15 servings 1x
- Category: Dessert
- Method: No-Bake
- Cuisine: American
Ingredients
- 1 (9-inch) baked and chilled pumpkin pie
- 1 (16 ounce) package vanilla candy coating or almond bark
Instructions
- Reserve some pie crust to sprinkle on top later.
- Break the chilled pumpkin pie into pieces and mix in an electric mixer until combined into a moist mixture (or use hands in a bowl).
- Roll the mixture into 2-tablespoon sized balls and place them on a parchment-lined baking sheet.
- Chill the balls in the freezer for 30 minutes or refrigerate for 2 hours.
- Melt the candy coating and dip each ball until fully coated, then sprinkle with reserved crust crumbs.
- Allow the coating to set before serving.
Nutrition
- Serving Size: 1 serving
- Calories: 120
- Sugar: 12g
- Sodium: 50mg
- Fat: 7g
- Saturated Fat: 3g
- Unsaturated Fat: 4g
- Trans Fat: 0g
- Carbohydrates: 15g
- Fiber: 1g
- Protein: 1g
- Cholesterol: 0mg