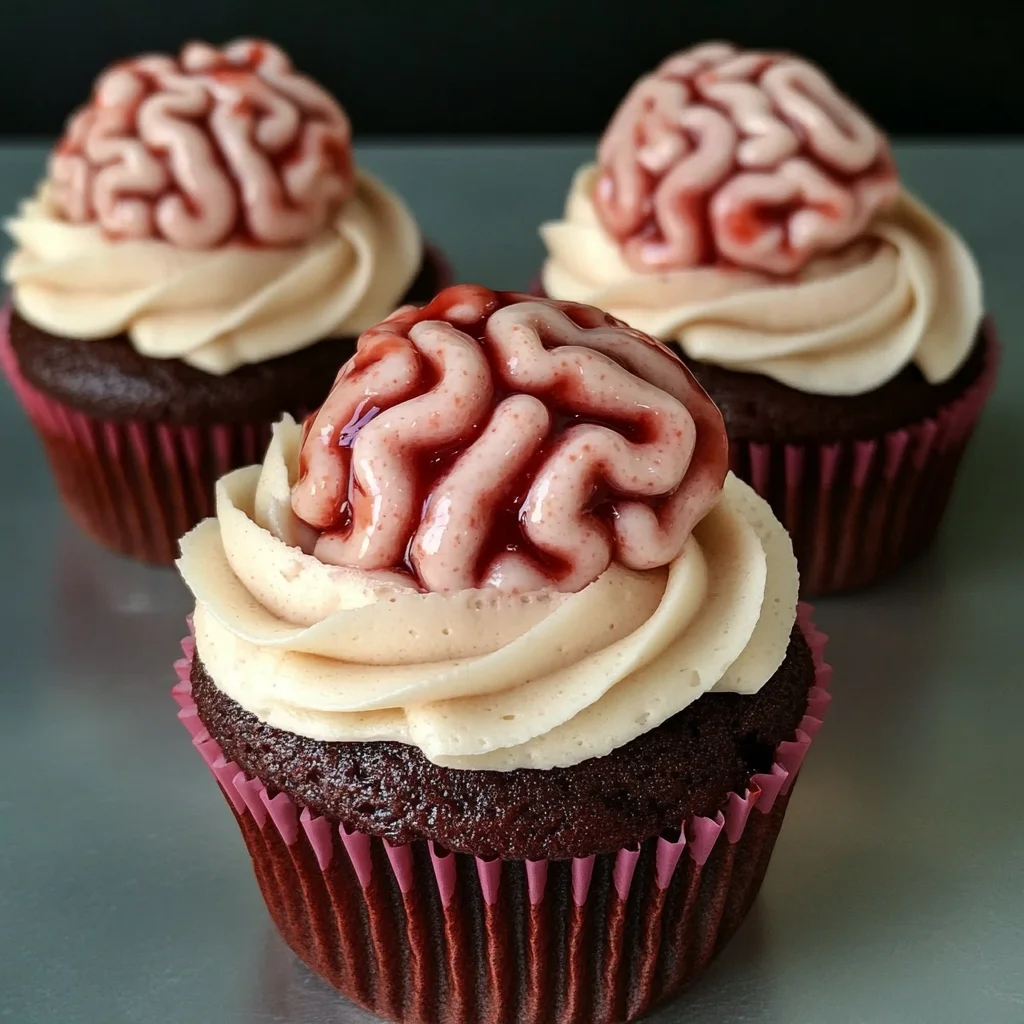
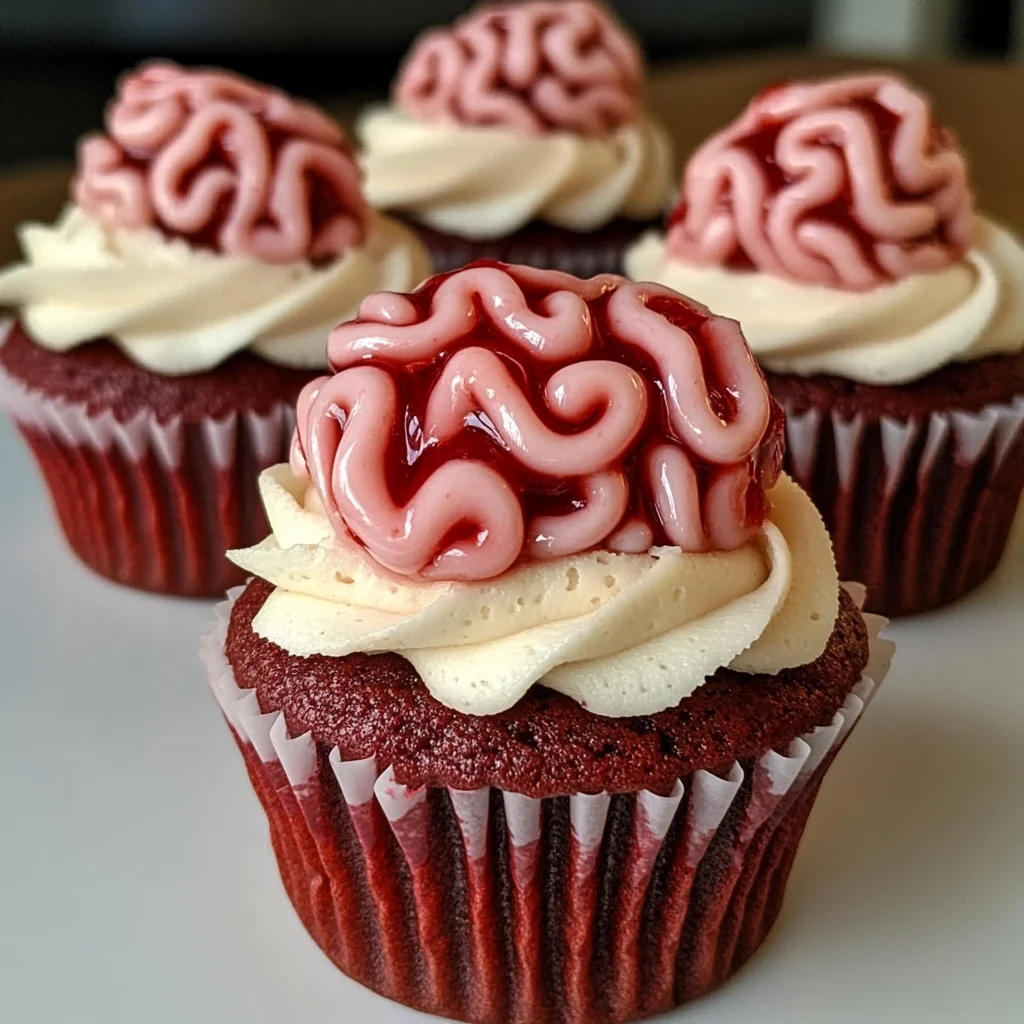
Bleeding Brain Cupcakes
Bleeding Brain Cupcakes are the perfect treat for Halloween celebrations or spooky-themed parties. These delightful red velvet cupcakes are not only visually striking but also deliciously filled with jam and topped with pink icing that resembles a brain. Their unique appearance and flavor make them an exciting addition to any dessert table, ensuring they will be a hit among guests of all ages.
Why You’ll Love This Recipe
- Fun Presentation: The brain-themed icing and vibrant color make these cupcakes a showstopper at any gathering.
- Delicious Flavor: The combination of rich red velvet and fruity jam provides a delightful burst of flavor in every bite.
- Easy to Make: With simple ingredients and straightforward steps, these cupcakes are accessible for bakers of all skill levels.
- Versatile Occasion: Perfect for Halloween, birthday parties, or any festive event where fun treats are welcomed.
- Customizable Decor: Feel free to get creative with the icing design; you can easily adjust colors or shapes for different themes.
Tools and Preparation
Before you start baking your Bleeding Brain Cupcakes, gather the necessary tools. Having everything ready will streamline your preparation process and ensure efficiency.
Essential Tools and Equipment
- Cupcake tin
- Black cupcake cases
- Mixing bowls
- Electric mixer (with paddle attachment)
- Measuring cups and spoons
- Piping bag
- Circular/round nozzle
Importance of Each Tool
- Electric mixer: Makes mixing the buttercream easy and ensures a fluffy texture without much effort.
- Cupcake tin: Essential for baking uniform cupcakes that hold their shape well during cooking.
- Piping bag: Allows for creative decorating, providing precise control when applying the brain icing design.
Ingredients
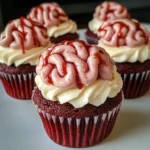
Red velvet cupcake, filled with jam, topped with brain themed pink icing – perfect for Halloween!
For the Cupcakes:
- 150 g Butter or baking spread (softened, unsalted)
- 150 g Caster sugar
- 2 Eggs (large)
- 1 tsp Vanilla extract
- 85 ml Buttermilk
- 165 g Self raising flour
- 1 1/2 tbsp Cocoa powder
- 1/2 tsp Bicarbonate of soda
- 1 tsp Red food colouring (I use Pro Gel or Sugarflair)
- 200 g Strawberry or Raspberry Jam
For the Buttercream:
- 200 g Butter (unsalted, softened)
- 400 g Icing sugar
- 1 tsp Vanilla extract
- 2 tbsp Milk
- Pink food colouring (I use Pro Gel or Sugarflair)
How to Make Bleeding Brain Cupcakes
Step 1: Preheat the Oven
Preheat your oven to 160C Fan/180C/350F/Gas Mark 4. Line a cupcake tin with black cupcake cases to give your treats a spooky look.
Step 2: Prepare the Cupcake Batter
Whisk together the softened butter and caster sugar in a mixing bowl until fluffy. This is best done using an electric mixer with a paddle attachment.
Step 3: Add Eggs and Vanilla
Add two large eggs and one teaspoon of vanilla extract to the mixture. Mix until fully combined.
Step 4: Incorporate Remaining Ingredients
Add buttermilk, cocoa powder, bicarbonate of soda, red food coloring, and self-raising flour. Mix until just combined; avoid overmixing to keep the cupcakes light.
Step 5: Fill the Cases
Divide the batter evenly among the lined cupcake cases. Aim for about two-thirds full to allow room for rising.
Step 6: Bake
Bake in your preheated oven for approximately 20-25 minutes. Check doneness by inserting a skewer into the center; it should come out clean.
Step 7: Cool Completely
Once baked, transfer cupcakes to a cooling rack. Allow them to cool completely before filling.
Step 8: Core and Fill with Jam
Using a cupcake corer or knife, create a hole in each cupcake’s center. Fill each hole generously with strawberry or raspberry jam using a small spoon or piping bag.
Step 9: Make the Buttercream
In another bowl, mix softened butter on its own for about two minutes until creamy. Gradually add icing sugar while mixing on low speed until incorporated.
Step 10: Add Milk and Color
Add milk, vanilla extract, and a small amount of pink food coloring. Mix until smooth; remember to keep it pale pink—add more color if needed but avoid dark shades.
Step 11: Decorate Your Cupcakes
Transfer your buttercream into a piping bag fitted with a circular nozzle. Pipe lines down each cupcake’s center followed by squiggles on either side to create the brain effect.
Step 12: Store Properly
Keep your Bleeding Brain Cupcakes in an airtight container in a cool place. Enjoy leftovers within three days for optimal freshness!
How to Serve Bleeding Brain Cupcakes
Serving Bleeding Brain Cupcakes can be a fun and creative experience, especially for Halloween parties or spooky-themed events. Here are some entertaining ways to present and enjoy these delicious treats.
Creative Presentation Ideas
- Spooky Platter: Arrange the cupcakes on a dark platter surrounded by fake spider webs for a creepy vibe.
- Cupcake Stand: Use a multi-tiered cupcake stand to showcase the cupcakes at different heights, making them the star of the dessert table.
- Themed Wrappers: Decorate with Halloween-themed cupcake wrappers that feature ghosts, bats, or pumpkins for added flair.
- Garnish with Edibles: Top each cupcake with edible glitter or candy eyeballs to enhance their eerie appearance.
Pairing Suggestions
- Hot Chocolate: Serve with warm cups of rich hot chocolate for a cozy treat.
- Green Punch: Offer a spooky green punch made from lime sherbet and lemon-lime soda for a fun drink pairing.
- Ghostly Cookies: Complement the cupcakes with ghost-shaped cookies decorated in white icing.
How to Perfect Bleeding Brain Cupcakes
Creating the perfect Bleeding Brain Cupcakes is all about attention to detail. Here are some tips to ensure your cupcakes turn out flawlessly.
- Bold Butter Mixing: Beat the butter thoroughly before adding other ingredients. This creates a lighter texture for your cupcakes.
- Precise Measuring: Use kitchen scales for accurate measurements of flour and sugar. This ensures consistent results every time.
- Cool Completely: Allow cupcakes to cool completely before filling them with jam. This prevents melting and ensures neat layers.
- Sparing Color Additions: When adding pink food coloring, start with a small amount. You can always add more if needed but can’t remove excess color.
- Piping Technique: Use steady pressure while piping frosting for even swirls and squiggles. Practice on parchment paper if necessary before decorating the actual cupcakes.
Best Side Dishes for Bleeding Brain Cupcakes
To complement your Bleeding Brain Cupcakes, consider serving these delightful side dishes that fit the spooky theme while also being delicious.
- Pumpkin Soup: A creamy pumpkin soup spiced with nutmeg adds warmth and pairs well with sweet cupcakes.
- Witch’s Fingers: Create savory cheese-stuffed breadsticks shaped like fingers complete with almond nails.
- Mummy Dogs: Hot dogs wrapped in crescent roll dough, baked until golden brown, make a fun finger food option.
- Cauldron Chili: A hearty vegetarian chili served in small pots creates a filling contrast to sweet treats.
- Monster Fruit Skewers: Assemble fruit skewers using grapes, melon balls, and strawberries for colorful and healthy bites.
- Creepy Veggie Platter: Arrange an assortment of vegetables cut into spooky shapes served with hummus or dip in black bowls for effect.
- Spider Deviled Eggs: Classic deviled eggs decorated with olives to resemble spiders offer a playful touch to your spread.
- Eyeball Pasta Salad: A pasta salad featuring mozzarella balls and cherry tomatoes that look like eyeballs adds whimsy to your menu.
Common Mistakes to Avoid
Making Bleeding Brain Cupcakes can be fun, but there are a few common mistakes to watch out for.
- Boldly overlook the cooling time: If you try to decorate the cupcakes before they are fully cooled, the icing will melt and lose its shape. Always let them cool completely on a rack.
- Boldly forget to fill: Skipping the jam filling means missing out on that delicious surprise inside. Use a corer or knife to create a pocket for the jam in each cupcake.
- Boldly rush the buttercream: Mixing the buttercream too quickly can lead to lumps. Take your time, and mix until smooth for the best texture and flavor.
- Boldly ignore food coloring amounts: Using too much food coloring can overpower the taste. Start with a little and add more if needed for that perfect shade of pink.
- Boldly skip storage tips: Not storing your cupcakes properly can lead to drying out. Keep them in an airtight container in a cool place to maintain freshness.
Storage & Reheating Instructions
Refrigerator Storage
- Store in an airtight container for up to 3 days.
- Keep away from direct sunlight and heat sources.
Freezing Bleeding Brain Cupcakes
- Place in an airtight container or freezer bag for up to 2 months.
- Ensure they are completely cooled before freezing.
Reheating Bleeding Brain Cupcakes
- Oven: Preheat to 150C/300F, wrap in foil, and heat for about 10-15 minutes.
- Microwave: Heat individually for about 10-15 seconds on low power, checking frequently.
- Stovetop: Place in a covered pan over low heat, warming gently for about 5 minutes.
Frequently Asked Questions
Here are some common questions about making Bleeding Brain Cupcakes.
What makes Bleeding Brain Cupcakes special?
Bleeding Brain Cupcakes are not just visually stunning; they combine rich red velvet flavor with sweet jam filling, making them a delightful treat for any occasion.
Can I use other flavors instead of red velvet?
Yes! You can experiment with different cake flavors like chocolate or vanilla while keeping the brain-themed decoration intact.
How do I achieve the perfect brain effect with icing?
To create the brain look, use a piping bag fitted with a round nozzle. Pipe a line down the center and squiggles on either side for added detail.
Can I make these cupcakes ahead of time?
Absolutely! You can bake and fill them a day in advance. Just store them properly and ice them closer to serving time for freshness.
Are Bleeding Brain Cupcakes suitable for kids?
Yes! With adult supervision during decorating, these cupcakes can be fun Halloween treats that kids will enjoy both making and eating.
Final Thoughts
Bleeding Brain Cupcakes are not only perfect for Halloween; they offer versatility for various celebrations too. Feel free to customize your fillings or icing colors based on personal preferences. They are sure to impress your guests!
Bleeding Brain Cupcakes
Indulge in the spooky delight of Bleeding Brain Cupcakes, an exciting treat perfect for Halloween celebrations and themed parties. These visually striking red velvet cupcakes are filled with luscious jam and topped with whimsical pink icing that mimics a brain, creating a fun and festive dessert that will captivate guests of all ages. The rich flavor of the red velvet combined with the sweet fruit filling offers an irresistible burst of taste in every bite. Simple to prepare and versatile for any occasion, these cupcakes are sure to become a favorite in your dessert repertoire.
- Prep Time: 30 minutes
- Cook Time: 25 minutes
- Total Time: 55 minutes
- Yield: Approximately 12 servings 1x
- Category: Dessert
- Method: Baking
- Cuisine: American
Ingredients
- 150 g softened unsalted butter
- 150 g caster sugar
- 2 large eggs
- 1 tsp vanilla extract
- 85 ml buttermilk
- 165 g self-raising flour
- 1.5 tbsp cocoa powder
- 1/2 tsp bicarbonate of soda
- 1 tsp red food coloring
- 200 g strawberry or raspberry jam
- 200 g softened unsalted butter (for icing)
- 400 g icing sugar
- 1 tsp vanilla extract (for icing)
- 2 tbsp milk
- Pink food coloring
Instructions
- Preheat your oven to 160C Fan/180C/350F/Gas Mark 4. Line a cupcake tin with black cases.
- In a mixing bowl, whisk together the softened butter and caster sugar until fluffy using an electric mixer.
- Add in the eggs and vanilla extract, mixing until combined.
- Gradually incorporate buttermilk, cocoa powder, bicarbonate of soda, red food coloring, and self-raising flour until just mixed.
- Divide the batter into cupcake cases, filling them about two-thirds full.
- Bake for 20-25 minutes or until a skewer inserted comes out clean. Cool completely on a rack.
- Core each cupcake's center and fill with jam using a piping bag or spoon.
- For the buttercream, mix softened butter until creamy; gradually add icing sugar at low speed followed by milk and pink food coloring until smooth.
- Pipe the icing onto cupcakes to create a brain effect.
Nutrition
- Serving Size: 1 serving
- Calories: 320
- Sugar: 30g
- Sodium: 180mg
- Fat: 15g
- Saturated Fat: 9g
- Unsaturated Fat: 4g
- Trans Fat: 0g
- Carbohydrates: 42g
- Fiber: <1g
- Protein: 3g
- Cholesterol: 50mg