Basic Vanilla Buttercream
The Basic Vanilla Buttercream is a staple in dessert-making that elevates any cake or cupcake. This creamy frosting is perfect for various occasions, from birthday celebrations to elegant weddings. Its smooth texture and rich vanilla flavor make it a favorite among bakers and sweet tooths alike. With just a few simple ingredients, you can create a delicious frosting that pairs beautifully with many desserts.
Why You’ll Love This Recipe
- Easy to Make – With just a few ingredients and straightforward steps, you can whip up this buttercream in no time.
- Versatile Flavor – This frosting is perfect for cakes, cupcakes, and cookies, making it a must-have in your baking arsenal.
- Customizable – You can easily modify the flavor by adding different extracts or colorings to suit your taste or occasion.
- Smooth Texture – This buttercream spreads beautifully, ensuring your desserts look as good as they taste.
- Perfect for Decorating – Its consistency makes it fantastic for piping intricate designs on cakes and cupcakes.
Tools and Preparation
To make the Basic Vanilla Buttercream, you will need a few essential tools to ensure smooth preparation.
Essential Tools and Equipment
- Stand mixer
- Whisk attachment
- Mixing bowl
- Measuring cups
- Sifter
Importance of Each Tool
- Stand mixer – Provides the power needed to whip butter into a fluffy texture effortlessly.
- Whisk attachment – Ensures thorough mixing and aeration for a light and airy buttercream.
- Sifter – Helps avoid lumps in the confectioners’ sugar, resulting in a smooth final product.
Ingredients
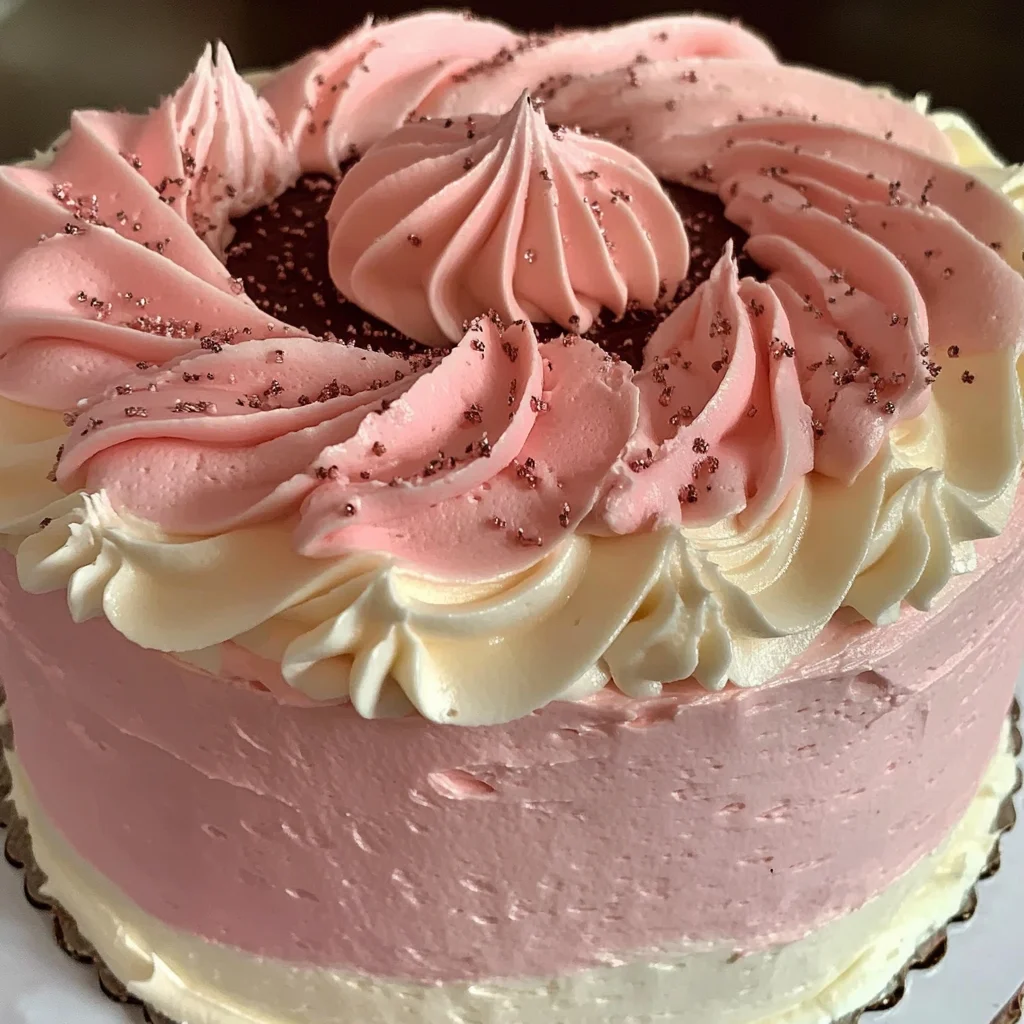
This is the original Neapolitan Rose Cake… everything else is just a copy!
For the Basic Vanilla Buttercream
- 1 cup (2 sticks / 227 g) unsalted butter, softened
- 2 teaspoons McCormick® Pure Vanilla Extract
- 32 ounces confectioners’ sugar, sifted
- 2 tablespoons whole milk (up to ½ cup)
- Pinch kosher salt
How to Make Basic Vanilla Buttercream
Step 1: Beat the Butter
Start by beating the unsalted butter in the bowl of your stand mixer with the whisk attachment on medium-high speed until it becomes light and fluffy. This should take about 3 minutes.
Step 2: Add Vanilla Extract
Once the butter is fluffy, add in the McCormick® Pure Vanilla Extract. Mix until well combined.
Step 3: Incorporate Sugar and Milk
With the mixer set to low speed:
1. Slowly add in the confectioners’ sugar, ensuring it’s mixed thoroughly.
2. Next, pour in the whole milk and add a pinch of kosher salt.
3. Remember to scrape down the sides and bottom of the bowl occasionally.
Step 4: Whip Until Fluffy
Once all ingredients are incorporated, increase the speed of your mixer to medium-high or high. Whip your frosting for at least 3 minutes; longer if desired—my mixer ran for about 7 minutes.
Step 5: Adjust Consistency
If your frosting appears too thick for spreading, gradually beat in additional milk until you reach your preferred consistency.
How to Serve Basic Vanilla Buttercream
Basic Vanilla Buttercream is a versatile frosting that can elevate any dessert. It pairs beautifully with various cakes, cookies, and pastries, making it a favorite for both bakers and dessert lovers.
On Cakes
- Layer Cakes: Spread a generous layer between cake layers for added richness.
- Cupcakes: Pipe onto cupcakes for an eye-catching finish.
- Sheet Cakes: Smooth over sheet cakes for an easy, elegant look.
With Cookies
- Sandwich Cookies: Use as a filling for homemade whoopie pies or sandwich cookies.
- Dipped Cookies: Dip half of a cookie in the buttercream for a sweet twist.
Other Desserts
- Brownies: Top brownies with Basic Vanilla Buttercream for an indulgent treat.
- Pancakes: Spread on pancakes instead of syrup for a sweet breakfast option.
How to Perfect Basic Vanilla Buttercream
Perfecting Basic Vanilla Buttercream is all about technique and the right ingredients. Follow these tips to achieve the best results.
- Use softened butter: Ensure your butter is at room temperature to create a smooth texture.
- Sift confectioners’ sugar: This helps prevent lumps and ensures a creamy consistency.
- Adjust milk gradually: Start with less milk; you can always add more if needed to reach the desired consistency.
- Whip thoroughly: The longer you whip, the fluffier the frosting will be—aim for at least 3 minutes.
- Flavor variations: Experiment by adding different extracts, like almond or lemon, for unique flavors.
Best Side Dishes for Basic Vanilla Buttercream
Basic Vanilla Buttercream complements many delightful side dishes. Here are some perfect pairings that enhance your dessert experience.
- Fresh Berries: Brighten your plate with seasonal berries that add tartness against the sweetness of the frosting.
- Fruit Salad: A light fruit salad offers freshness and balances the richness of cakes topped with buttercream.
- Chocolate Chip Cookies: Serve alongside chocolate chip cookies for a classic combination everyone loves.
- Ice Cream: Pair with vanilla or chocolate ice cream for an indulgent dessert plate.
- Shortbread Cookies: Enjoy with buttery shortbread cookies as a decadent treat alongside your frosted creations.
- Coffee or Tea: A warm cup of coffee or tea can provide a comforting balance to sweet desserts garnished with buttercream.
Common Mistakes to Avoid
When making Basic Vanilla Buttercream, it’s easy to run into some common pitfalls. Here are a few mistakes to watch out for:
- Ignoring room temperature butter: Using cold butter will result in a lumpy frosting. Always let your butter soften at room temperature before mixing.
- Not sifting the sugar: If you skip sifting confectioners’ sugar, you’ll end up with clumps in your frosting. Always sift the sugar before adding it to ensure a smooth texture.
- Adding too much liquid: Adding milk too quickly can make your frosting runny. Gradually add liquid until you reach the desired consistency.
- Overmixing the frosting: While it’s important to mix well, overmixing can cause air bubbles and a grainy texture. Aim for light and fluffy without excessive mixing.
- Neglecting flavor adjustments: Basic Vanilla Buttercream is versatile. If you want different flavors, don’t hesitate to experiment with extracts or add-ins like cocoa powder or fruit puree.

Storage & Reheating Instructions
Refrigerator Storage
- Store in an airtight container for up to 1 week.
- Make sure to let it cool completely before sealing to avoid condensation.
Freezing Basic Vanilla Buttercream
- Freeze in an airtight container for up to 3 months.
- When ready to use, thaw overnight in the refrigerator.
Reheating Basic Vanilla Buttercream
- Oven: Preheat your oven to a low temperature (around 200°F) for about 5 minutes, then turn it off and place the buttercream inside for gentle warming.
- Microwave: Heat in short bursts of 5-10 seconds on low power until slightly soft, stirring after each interval.
- Stovetop: Use a double boiler method by placing the container with buttercream over simmering water until softened.
Frequently Asked Questions
What is Basic Vanilla Buttercream?
Basic Vanilla Buttercream is a classic frosting made from butter, confectioners’ sugar, vanilla extract, and milk. It’s perfect for cakes and cupcakes.
How do I make Basic Vanilla Buttercream more flavorful?
You can enhance its flavor by adding extracts like almond or lemon. A pinch of salt can also elevate the taste.
Can I use this recipe for other cakes?
Absolutely! Basic Vanilla Buttercream pairs beautifully with various cake flavors including chocolate, red velvet, and carrot cake.
How long does Basic Vanilla Buttercream last?
When stored properly in an airtight container, it lasts up to one week in the refrigerator and three months in the freezer.
Can I color my Basic Vanilla Buttercream?
Yes! You can add food coloring gradually until you achieve your desired shade. Gel colors work best for vibrant results.
Final Thoughts
The appeal of Basic Vanilla Buttercream lies in its simplicity and versatility. Whether you’re topping off a cake or filling cupcakes, this frosting delivers delightful sweetness. Feel free to customize it with flavored extracts or colors to match any occasion!
Basic Vanilla Buttercream
Indulge in the smooth, creamy delight of Basic Vanilla Buttercream, a timeless frosting that transforms any dessert into a masterpiece. Whether you’re decorating a birthday cake or embellishing cupcakes for a wedding, this versatile buttercream is the perfect addition to your baking repertoire. Made with just a handful of ingredients, including rich unsalted butter and pure vanilla extract, it’s easy to whip up and customize. This frosting can be piped beautifully for an elegant finish or spread generously for a rustic touch. Elevate your baking game with this simple yet delicious recipe that everyone will love!
- Prep Time: 10 minutes
- Cook Time: N/A
- Total Time: 0 hours
- Yield: Approximately 24 servings 1x
- Category: Dessert
- Method: N/A
- Cuisine: N/A
Ingredients
- 1 cup (2 sticks / 227 g) unsalted butter, softened
- 2 teaspoons McCormick® Pure Vanilla Extract
- 32 ounces confectioners' sugar, sifted
- 2 tablespoons whole milk (up to ½ cup)
- Pinch kosher salt
Instructions
- Beat softened unsalted butter in a stand mixer with the whisk attachment on medium-high speed until light and fluffy (about 3 minutes).
- Add vanilla extract and mix until combined.
- With the mixer on low speed, gradually add confectioners' sugar until fully incorporated.
- Pour in whole milk and add a pinch of kosher salt; mix well.
- Increase the speed to medium-high and whip the frosting for at least 3 minutes until fluffy.
- If too thick, gradually add more milk until reaching desired consistency.
Nutrition
- Serving Size: 1 serving
- Calories: 56
- Sugar: 11g
- Sodium: 5mg
- Fat: 2g
- Saturated Fat: 1g
- Unsaturated Fat: 1g
- Trans Fat: 0g
- Carbohydrates: 10g
- Fiber: 0g
- Protein: 0g
- Cholesterol: 15mg